In the dynamic world of *Basketball Zero*, your zone and style combo are the backbone of your build. Understanding which zones work best and how they synergize with different styles can elevate your gameplay significantly. I've meticulously analyzed every zone in the game to bring you a comprehensive tier list and the most effective zone and style combinations. Let's dive into the specifics and discover how you can optimize your performance on the court.
All Basketball Zero Zones Ranked
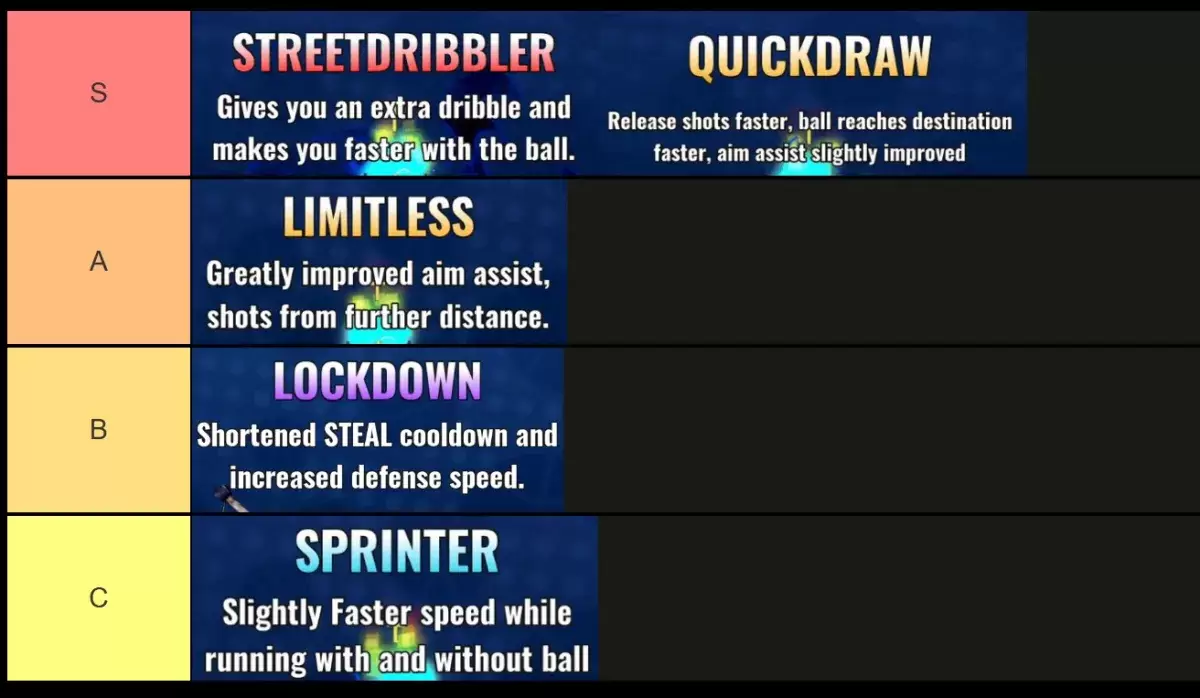
When it comes to identifying the best zones in *Basketball Zero*, the top performers are **Street Dribbler, Quickdraw, and Limitless**, with their effectiveness varying based on your chosen Style. While **Sprinter** has the potential to climb into the A-Tier due to the critical importance of movement speed, it currently languishes in lower tiers, as does **Lockdown**. Let's explore the detailed reasoning behind these rankings, along with the stats and optimal style/zone combinations.
S-Tier Basketball Zero Zones
| **Name** | **Rarity and Roll Chance** | **Effects** | **Ranking Reason** | **Best Style Combo** |
| **Street Dribbler** | *Mythic (0.5% or 5% Lucky Odds)* | • Grants an extra dribble charge • Increases speed with the ball | The ability to have an extra dribble is unparalleled for defense, while the increased speed with the ball lets you outmaneuver defenders and reach the basket quicker, often preserving your dribble charges. This makes Street Dribbler the undisputed top zone in *Basketball Zero*. | Star or Ace |
| **Quickdraw** | *Legendary (2% or 45% Lucky Odds)* | • Speeds up shot release • Increases the speed of shots and passes • Provides slight aim assist | Quickdraw ranks as the second-best zone because faster shot release makes blocking your shots more difficult, and quicker passes enhance your team's dynamic. The added aim assist is particularly beneficial for players still honing their shooting skills. | Ace or Phantom |
A-Tier Basketball Zero Zones
| **Name** | **Rarity and Roll Chance** | **Effects** | **Ranking Reason** | **Best Style Combo** |
| **Limitless** | *Legendary (2% or 45% Lucky Odds)* | • Provides significant aim assist • Extends the range on shots | The extended range on shots is a game-changer, and the aim assist is invaluable for beginners. However, as you master the game's mechanics, the reliance on aim assist diminishes, placing Limitless firmly in A-Tier. | Sniper or Ace |
B-Tier Basketball Zero Zones
| **Name** | **Rarity and Roll Chance** | **Effects** | **Ranking Reason** | **Best Style Combo** |
| **Lockdown** | *Epic (35% or 50% Lucky Odds)* | • Reduces ball steal cooldown • Boosts defense speed | Lockdown shines when paired with Phantom, enabling frequent steals and quick passes to teammates. It's also effective for carrying with Ace or Star, though it doesn't match the power of S and A-Tier zones. | Phantom for Support and Ace or Star for Carrying |
C-Tier Basketball Zero Zones
| **Name** | **Rarity and Roll Chance** | **Effects** | **Ranking Reason** | **Best Style Combo** |
| **Sprinter** | *Rare (62.5%)* | • Slightly increases speed with and without the ball | Sprinter has the potential to be an A-Tier zone due to the importance of speed in *Basketball Zero*. However, the speed boost it offers is modest, relegating it to C-Tier, though it might reach B-Tier in specific scenarios. | All Except Sniper |
That concludes my detailed *Basketball Zero* zones tier list. To further enhance your gameplay, don't forget to check out our *Basketball Zero* codes for free regular and lucky spins, which can help you acquire these powerful zones.